How to convert a van into a camper: every step in order
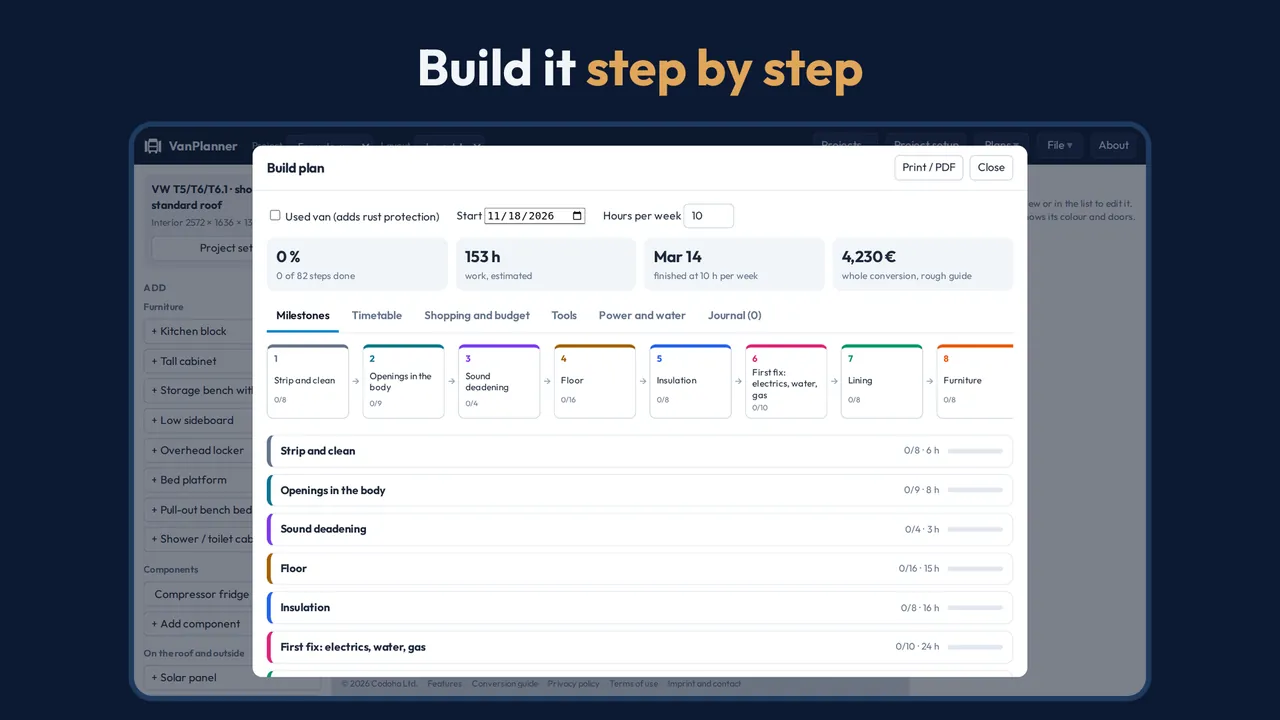
A camper conversion goes wrong less often through bad woodwork than through the wrong order: a floor laid before the rust was treated, lining fitted before the cables were in. This guide lists the work in the order that keeps every later step possible. Quantities and hours are for a used short-wheelbase van (load space about 2572 mm long and 1343 mm high) with common choices; in the planner the same list adapts to your van and your choices.
Open the planner Free, in your browser, no account needed
The steps
- Strip and clean
- Rust protection
- Openings in the body
- Sound deadening
- Floor
- Insulation
- First fix: electrics, water, gas
- Lining
- Furniture
- Second fix and testing
- Registration as a camper
1. Strip and clean
Everything that follows is glued to the metal, so the van first goes back to bare, clean, dry sheet metal.
- Take out the old floor, wall panels and anything screwed to them. Bag and label the screws and clips you want to reuse.
- Unbolt the partition. Keep the bolts: the threads are useful fixing points later.
- CleanSweep and vacuum the whole load space, including the sills, the wheel arches and the door steps.
- CleanWash the floor and walls with warm water and a little detergent. Let it dry completely with the doors open.
- CleanRemove old glue, tape and silicone with adhesive remover and a plastic scraper.
- Look over every seam, the wheel arches and the floor for rust, dents and open holes. Mark what you find with tape.
- Find the forced-ventilation openings (usually behind the rear bumper corners) and mark them: they must never be covered.
- Photograph the bare van from all sides, with a tape measure in the picture. You will want these when cables and ribs are covered.
Materials
- Adhesive remover: 1 bottle
- Brake cleaner or silicone remover: 3 can
- Microfibre cloths: 1 pack
- Masking tape: 2 roll
2. Rust protection
On a used van, rust under the insulation keeps growing unseen. Treat it now, while every panel can still be reached.
- Take loose rust off down to bright metal with a wire brush, a flap disc or abrasive fleece. Wear goggles and a mask.
- CleanVacuum the grinding dust and wipe the spots with brake cleaner.
- Brush rust converter into pits and seams you cannot grind clean. Follow the reaction time on the bottle.
- Paint the treated spots with a rust-protection primer or a one-coat metal paint, overlapping the sound paint by a few centimetres.
- WaitLet the paint harden as long as the tin says, usually one to two days, before anything is glued on it.
- Close unused holes: paint the bare edge, then a rubber grommet, a blind rivet with sealant or a glued-on metal patch.
- Spray cavity wax with the long probe into sills, door bottoms, pillars and the box sections of the floor. Put cardboard under the drain holes.
- CleanWipe overspray and wax off every surface that will be glued. Wax under an adhesive means it will not hold.
Materials
- Rust converter: 1 bottle
- Rust-protection primer or metal paint 750 ml: 1 tin
- Wire brush, flap discs, abrasive fleece: 1 set
- Brushes: 1 set
- Grommets and blind plugs, assorted: 1 box
- Body sealant: 1 cartridge
- Cavity wax with probe, 500 ml: 4 can
3. Openings in the body
Every hole in the sheet metal is cut now: afterwards the swarf can still be vacuumed and the cut edges painted.
- Mark every opening from the inside and check outside that it clears ribs, seams and the sliding door track. The window sheets in the Plans menu give the positions.
- Place each roof opening between two roof bows, never across one, and leave the side roof frames whole. Bond a frame all round it that ties into the bows (VW). An opening that cuts a bow means no roof load may be carried at all.
- Tape the paint around each cut, cover the inside with sheets, and drill a pilot hole in each corner.
- Cut with a jigsaw and a fine metal blade, or a nibbler. Support the panel so it does not drop.
- CleanVacuum the swarf at once, with a magnet for the corners. Swarf left overnight leaves rust spots.
- Deburr every cut edge and paint it with primer. Let it dry.
- Bond in the windows and vents with the adhesive and primer their maker names, press or clamp them, and leave the van standing while it cures.
- WaitLet the window adhesive cure, usually 24 hours, before driving or washing.
- Test with a hose from outside while someone watches inside.
- Cut the hole for the shore-power inlet, paint the edge, and fit it with sealant.
Materials
- Window adhesive with primer and activator: 1 set
- Jigsaw blades for sheet metal: 1 pack
- Edge primer: 1 tin
- Windows: 1 pc (price varies widely with type)
- Roof vent or skylight: 1 pc
- Shore-power inlet: 1 pc
4. Sound deadening
Butyl mats on the big panels stop them drumming. They add weight, so cover part of each panel, not all of it.
- CleanDegrease every panel that gets a mat with brake cleaner. The metal must be dry and not cold: above 15 °C.
- Cut the mats to size with a knife on a board. Wear gloves: the foil edges are sharp.
- Stick each piece to the middle of its panel and roll it down hard until the pattern of the foil is pressed flat.
- Knock on the panels: a dull thud means it is enough. Add a piece where it still rings.
Materials
- Butyl sound-deadening mat, 2 mm: 7.5 m² (about 26 kg)
- Pressure roller: 1 pc
5. Floor
The floor carries everything else. Its height is taken off the standing room, so the build-up chosen here sets the floor thickness of the 3D model.
- CleanVacuum the metal floor and degrease it where anything will be glued.
- Make a template of the floor from cardboard or the old floor: wheel arches, door steps, the curve at the front. Mark the lashing points.
- Cut the battens. Lay them out dry along the van, in the valleys between the floor ribs, 400 mm apart, with one across at each end and one under every board joint.
- Seal the battens all round with wood preserver or varnish and let them dry.
- CleanScuff the paint lightly where the battens go and wipe it with the adhesive maker's cleaner or activator.
- Run a zigzag bead of flexible body adhesive under each batten, press it down, and weigh it down with whatever is heavy. No screws through the floor.
- WaitLeave the adhesive to cure for 24 hours with the weights on.
- Cut the insulation to fit snugly and lay it in loose, joints tight together.
- Cut the floor board from the template: 3 pieces. Try it in the van before going on, and check the doors still close.
- Seal the cut edges and the underside of the board with varnish or edge sealer, also around every hole.
- Cut openings for the lashing points you want to keep using, or mark where the furniture bolts will go through to them.
- Bond the board to the battens with body adhesive, weigh it down and let it cure for 24 hours.
- CleanVacuum the board and wipe it dust-free before the covering goes on.
- Let the vinyl lie flat in the warm for a day. Glue it over the whole face, roll it out from the middle, and trim the edges in place.
- Fit edge profiles at the sliding door and the tailgate, and seal the edge to the body with a flexible sealant.
- Check once more that the forced-ventilation openings are free.
Materials
- Degreaser or adhesive cleaner: 1 bottle
- Battens 20 × 40 mm: 21 m
- Flexible body adhesive, 300 ml: 6 cartridge (with the cleaner and primer its maker names)
- Wood preserver or varnish: 1 tin
- XPS board (rigid, takes load), 20 mm: 5 m²
- Film-faced plywood (Siebdruck), 12 mm, sheets 2500 × 1250: 3 sheet (3 pieces, see the cutting sketch)
- Varnish or edge sealer: 1 tin
- Vinyl sheet, glued: 5 m²
- Flooring adhesive: 1 tub
- Edge profile for the door steps: 3 m
- Flexible sealant: 1 cartridge
A typical floor build-up
From the metal upwards, 36 mm in total:
- Butyl mat 2 mm (part of the area)
- Battens 20 mm, insulation between: XPS board (rigid, takes load)
- Floor board 12 mm: Film-faced plywood (Siebdruck)
- Covering 2 mm: Vinyl sheet, glued
6. Insulation
Walls, roof, doors and the separation from the cab. The aim is as much about keeping condensation off the cold metal as about keeping heat in.
- CleanDegrease all sheet metal that will be covered. It must be dry and warmer than 15 °C, or nothing sticks.
- Before covering anything: pull in the cables and conduits that run behind the insulation, or at least a pull-wire for each (see First fix).
- Cut the foam for the large panels a little oversize, peel the backing a hand's width at a time and press it on without air bubbles.
- Cover the ribs and pillars with thin foam (3 to 6 mm), so no bare metal is left to sweat.
- Cover the wheel arches, working the foam round the curve in strips.
- Insulate the doors and the tailgate behind their panels. Keep clear of the lock rods, the window run and the drain holes at the bottom.
- Fix a rail across the roof behind the front seats and hang an insulated curtain (quilted, with a reflective layer). It should overlap the walls and reach the floor, so no cold air falls through a gap.
- Tape every joint with the matching foam tape so the layer is closed.
- Leave the forced-ventilation openings and the door drain holes free.
Materials
- Closed-cell foam, self-adhesive (Armaflex type), 19 mm: 16 m²
- Thin self-adhesive foam, 6 mm, for ribs: 2.5 m²
- Foam tape for joints: 2 roll
- Degreaser: 2 can
- Curtain rail with runners: 2 m
- Insulated curtain fabric, quilted: 3 m²
7. First fix: electrics, water, gas
Everything that runs behind the lining goes in while the walls are open: cables, pipes and the fixing points for furniture.
- Draw the wiring and plumbing: where each consumer sits in the layout, cable lengths, cross-sections and fuses. Decide where the battery and the fuse box go.
- Fix the wall and ceiling battens to the ribs. The Structure section of the model has them with lengths.
- Lay conduits or cable ducts along the ribs to every light, switch, socket and appliance, with a pull-wire in each. One spare conduit to the rear and one to the roof.
- Pull the cables and label both ends. Leave half a metre spare at each end.
- Wherever a cable passes through sheet metal: a rubber grommet, never a bare edge.
- Run the charging cable from the starter battery to the second battery, fused at both ends, through an existing grommet in the bulkhead.
- Run the solar cable from the roof entry to where the charge controller will sit.
- Test every cable for continuity and every pipe for leaks now. After the lining is on, a fault means taking it off again.
- Photograph every wall with a tape measure in view, so you know later where cables and pipes run.
- CleanVacuum the drilling swarf.
Materials
- Second battery 100 Ah, LiFePO4: 1 pc
- Fuse box, main fuses, battery isolator: 1 set
- Cable 1.5 to 6 mm², red and black: 50 m
- Conduit or cable duct: 25 m
- Grommets, cable lugs, ferrules, heat-shrink: 1 set
- LED lights and switches: 3 circuit
- Charging booster with cable 16 mm²: 1 set
- Solar panel 200 W, controller, mounts, cable: 1 set
- Canisters, submersible pump, tap, hose: 1 set
8. Lining
What you see and touch: felt on the curved metal, panels on the flat areas, and the ceiling.
- CleanWipe every surface that gets felt dust- and grease-free. Mask the seals, the windows and the floor: spray adhesive drifts everywhere.
- Open all doors and wear a mask with a solvent filter: the adhesive fumes are heavy.
- Felt the pillars and frames first. Spray both the metal and the back of the felt, wait until it is touch-dry, lay it on from the middle and stretch it round the curves. Tuck the edges under the seals.
- Make cardboard templates of each wall and door panel, mark the cut-outs for lights, switches and sockets, and cut the panels from 3 to 4 mm plywood.
- Cover the panels in felt on the bench, wrap it 30 mm round the back, and fix them to the battens with screws and caps or with clips.
- Cut the ceiling panels, cut the holes for the lights, cover them in felt and screw them to the roof battens. Connect the lights as each panel goes up.
- Fit the door and tailgate panels with the original clips.
- Check that every cable end is where it should be and long enough, before the furniture hides it.
Materials
- 4-way stretch felt, 2 m wide: 10 m
- High-temperature spray adhesive, 500 ml: 8 can
- Respirator filters, masking film: 1 set
- Plywood 3 to 4 mm, sheets 2500 × 1250: 6 sheet
- Panel clips, screws and caps: 1 set
9. Furniture
The furniture from the 3D layout. Each piece has its own cut list and build steps: select it in the model and open Build steps.
- Have the boards cut from the cut list and the sheet layout (Plans menu), or cut them yourself. Label every part with its code.
- Sand, round over and edge-band the visible edges.
- Assemble each piece dry and try it in the van: the walls are never as straight as the drawing.
- Build the pieces in the order of their build steps, largest first.
- Finish the surfaces before the final fitting, all sides of each board, so they do not warp.
- WaitLet the finish harden for the time on the tin.
- Bolt each piece to the van through the lashing points and rivet nuts, with large washers. A cabinet full of water or tins must stay put in a crash.
- CleanVacuum sawdust out of the van and out of every cabinet.
Materials
- Hard-wax oil: 1 tin
- Bolts M8, large washers, lock nuts: 1 set
- Sandpaper, glue, edge banding: 1 set
10. Second fix and testing
Appliances go in and get connected, and everything is tested under real conditions before the first trip.
- Connect battery, fuse box, chargers, lights, sockets and appliances. Fit the main fuse last.
- Test every circuit and every fuse. Check that the starter battery is not drained when the engine is off.
- Connect pump, tap and tanks. Fill up and check every joint for drips over a full day.
- Fit a smoke alarm, a carbon-monoxide alarm and a fire extinguisher within reach of the bed.
- Drive a rough road with everything loaded and listen. Fix rattles with felt pads and catches.
- Weigh the van, full and with people, on a public weighbridge: each axle and the total. Enter the figures in Project setup.
- CleanFinal clean, inside and out.
Materials
- Smoke alarm and CO alarm: 1 set
- Fire extinguisher 2 kg: 1 pc
- Weighbridge fee: 1 pc
11. Registration as a camper
Optional: registering the van as a motorhome can change tax and insurance. The rules differ by country; check them before you start, not after.
- Check the requirements with the inspection body (TÜV, Dekra) before building: fixed seats with a table, sleeping places, a fixed cooker and storage are the usual minimum.
- Collect the papers: weighing slip, gas certificate if there is gas, approvals of seats, windows, heater and roof parts.
- Present the van for the inspection and have the change entered in the registration papers.
- Tell the insurer and the registration office.
Materials
- Inspection and registration fees: 1 pc
Plan your own conversion
In VanPlanner you tick these steps off, change the choices (insulation material, floor build-up, heating, gas or no gas) and see materials, budget and timetable for your van.
Open the planner Free, in your browser, no account needed